For those of you interested in making your own board book, my advice to you, It's not that hard! In fact, it's really easy! I took pictures while I was making mine and I hope they help you.
What you need:
Tools:

Using the paper prototype, I was able to proofread the book and get a feel for whether the aspect ratio I picked felt good in my hands.

Once I was satisfied with the colors and the size, I printed directly onto the cardstock and trimmed the spreads to size. You can see I added a black line in the middle of the spread. This helped me demarcate the pages when I was designing the layout, but is not really necessary.

I then cut the chipboard using an exacto knife to cut long strips and then the papercutter to trim the pieces to the size of one page.


I was using 0.040" thick chipboard, which I felt was too flimsy to be used on its own. I did several tests, gluing the chipboard pieces to each other with wood glue to determine what the best thickness was. More pieces laminated together meant more stiffness, but also meant a larger overall thickness to the book. Working within this tradeoff, I found that two pieces glued together worked best.

I then tested gluing a piece of cardstock to the chipboard. I wanted to check how the pages turned if I simply glued two "pages" of the chipboard to one two-page spread. (Side note: I used a small piece of cardboard as a spreading tool for the glue)


The black in the photos is a piece of cardstock. I thought the small gap between the pages was enough to allow the pages to open fully. You may need to trim the chipboard a little bit in order to get enough clearance.
I then glued the spreads to the cardboard pieces in order, accordion-style, in a similar manner to the paper prototype. I thought of them as little chipboard and paper sandwiches.


I then made the covers. This part is interesting because depending on how thick your book is you're going to need a significant amount of extra material. I ended up buying single sheets of 11" x 17" cardstock to make the covers. If your printer can't print on 11" x 17", you could probably use legal size, as it's really the extra length you need. I took a piece of the longer card stock and wrapped it around my book as if it were the cover. I then marked where the book ended, laid out the paper and measured the distance need. I then used illustrator to create a cover spread at that length, with both covers and the title on the spine.


What you need:
Tools:
- Paper cutter and exacto knife(not strictly necessary, could use scissors)
- Wood Glue
- Color printer
- Art chipboard (available in large sheets at your local art supply store)
- Cardstock (I used 110 lb weight)
Using the paper prototype, I was able to proofread the book and get a feel for whether the aspect ratio I picked felt good in my hands.

Once I was satisfied with the colors and the size, I printed directly onto the cardstock and trimmed the spreads to size. You can see I added a black line in the middle of the spread. This helped me demarcate the pages when I was designing the layout, but is not really necessary.

I then cut the chipboard using an exacto knife to cut long strips and then the papercutter to trim the pieces to the size of one page.


The black in the photos is a piece of cardstock. I thought the small gap between the pages was enough to allow the pages to open fully. You may need to trim the chipboard a little bit in order to get enough clearance.
I then glued the spreads to the cardboard pieces in order, accordion-style, in a similar manner to the paper prototype. I thought of them as little chipboard and paper sandwiches.

I then made the covers. This part is interesting because depending on how thick your book is you're going to need a significant amount of extra material. I ended up buying single sheets of 11" x 17" cardstock to make the covers. If your printer can't print on 11" x 17", you could probably use legal size, as it's really the extra length you need. I took a piece of the longer card stock and wrapped it around my book as if it were the cover. I then marked where the book ended, laid out the paper and measured the distance need. I then used illustrator to create a cover spread at that length, with both covers and the title on the spine.

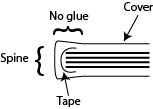
I then printed this on the larger cardstock and glued it around the whole book. Two things I learned when making this prototype. You don't want to glue the cover all the way to the end. By that I mean, there needs to be a section of the cover (up to a 1/2") nearest to the spine that is not glued to the chipboard. This allows the spine to move when opening the book. I actually used a ruler to help bend the cover up at the edge of the glue to give it a crease to facilitate the movement.

The other thing that I did not do for my first prototype, but that I did for all subsequent ones, was to tape around the spine before gluing the cover on. I tried several different kinds of tape and found that both packing tape and cloth tape worked reasonably well for this purpose.
And there you have it, a finished board book.


Ready for reading, or chewing, or throwing or whatever else you want to do with it.
No comments:
Post a Comment